Overview
Welcome to Data Stack Academy's Data Engineering Bootcamp!
In this course, you'll learn everything you need to know to be a well-seasoned Cloud Engineer: the Python programming language, automation with Airflow, SQL, Spark, Pandas, Google Cloud Platform (GCP) services, and more. We have specifically chosen Google Cloud over other cloud platforms because we believe GCP offers the best combination of services in the data engineering space, and because the GCP services are the closest to their open source Big Data counterparts. Nowadays, nearly all applications run on the cloud.
With this program, you'll learn all the necessary skills to start a career in Data Engineering. It will be challenging at times, but we're confident you'll find it enjoyable and rewarding, too. You're about to take the first step in a life-changing journey. Let's begin!
What is Data Engineering?
You are no doubt aware that we live in a world that is inundated with data, and that the amount of data is growing very rapidly. According to one typical prediction, there will be 175 zettabytes (1021 bytes, or a trillion gigabytes) of data in the world by 2025. There has been a growing awareness of the need to collect and leverage data for business, research, and decision-making, and in an increasingly digital world, data has become the single most valuable asset for many businesses.
But the amount of data has grown faster than the number of people who have the skills to work with it. Now that it is becoming common for companies to deal not just with terabytes of data, but with petabytes and more, new tools and techniques are required to efficiently deal with such staggeringly large quantities of information.
Data Engineers are responsible for managing an organization's data from ingestion, through various kinds of processing, to its eventual consumption by data scientists/analysts or end users. One of the reasons for the rapid rise of data engineering as a field is that in the last few years, as data science received a lot of attention, many organizations started to realize that for data scientists and analysts to be effective, they require a well-developed data infrastructure which enables them to easily access the data they need. Developing and maintaining that infrastructure is the job of the data engineer.
The tool stack used by data engineers is large, and includes programming, databases and SQL, APIs, containerization, and numerous cloud tools for orchestration, data processing, serverless architecture, streaming, and data visualization.Everything you learn in this class, and the skills that you will use as a data engineer, depends on developing a solid foundation in programming. And because Python has become unquestionably the dominant language for data professionals, the course will focus on developing and reinforcing your Python skills.
Course Overview
This section describes key concepts on how this course is designed and how it is intended to be followed. Please read this section thoroughly and in its entirety.
Forking the Git Project
All the instructions, exercises, and lessons for this course is included in our git repo:
https://github.com/datastackacademy/data-engineering-bootcamp.git
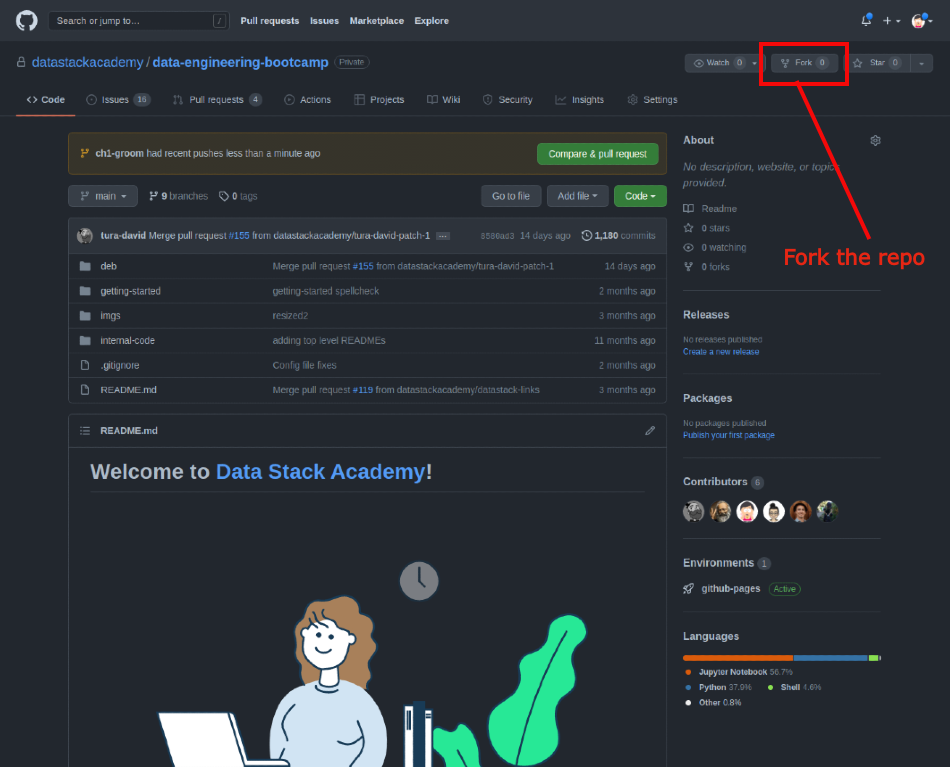
In order to easily follow the lesson while working on your own exercises, please fork the repo.
Navigate to the data-engineering-bootcamp git repo
Click the "Fork" button on the top right corner and Fork the repository under your own github profile
Now, you should have a new repo under your own profile with a link like:
https://github.com/MY_GIT_PROFILE/data-engineering-bootcamp.gitCopy your repo link and clone the repository on your local machine:
git clone https://github.com/MY_GIT_PROFILE/data-engineering-bootcamp.gitGoes without saying to replace
MY_GIT_PROFILEwith your profile name 😉️
Best Practice: Over the next few months, you'll be working with this project a lot. It's a good idea to a create a handy shortcut (symlink) to the project in your home folder:
cd ~
ln -s path_to_your_project deb
Now you can easily navigate to your project folder: cd ~/deb (deb is short for data-engineering-bootcamp).
Updating your Repo
Our repository is a living project and it is always evolving. We add new exercises and lessons or update existing ones and fix typos. You should constantly refresh your repo and get the latest changes from the original repo.
We recommend that you refresh your repo from the original before starting to work on each lesson (aka: episode).
Follow the instructions below to sync changes from the original repo.
Open a bash terminal
Change directory into your cloned repo
Execute
git remote -v. You should see the current remote upstream repositories for your fork.git remote -v
origin https://github.com/parvister/data-engineering-bootcamp.git (fetch)
origin https://github.com/parvister/data-engineering-bootcamp.git (push)Add an upstream to the original repo:
git remote add upstream https://github.com/datastackacademy/data-engineering-bootcamp.gitList your upstream repos again and you should add the URL for the original repo added:
git remote -v

origin  https://github.com/parvister/data-engineering-bootcamp.git (fetch)
origin  https://github.com/parvister/data-engineering-bootcamp.git (push)
upstream https://github.com/datastackacademy/data-engineering-bootcamp.git (fetch)
upstream https://github.com/datastackacademy/data-engineering-bootcamp.git (push)To sync changes from the original upstream repo run the following commands:
# fetch changes from upstream branches
git fetch upstream

# switch to your local main branch
git checkout main

# merge changes from the upstream main
git merge upstream/main
You might get merge conflicts if you have made any changes to your
mainbranch. Go ahead and resolve the conflicts and accept all the changes from the upstream repo.If you have any issues follow the git documentation on forking a repo and syncing a fork.
Exercise: If you haven't done so already, fork the repo and configure the remote upstream to be able to sync changes from our main repo.
Project Layout
Let's walk through the project folder together. Inside it you should see:
deb/ is the main course content folder, and contains all the code samples, instructions, and daily exercises for this course. Code samples are organized into chapters and episodes (ie:
deb/ch01_intro/ep1refers to chapter 1 episode 1). Each episode directory contains all the code, data, and instructions (README.md) for the lesson. Each episode typically includes anexercises/folder which contains exercises similar to the lesson. Each episode is typically intended for a full day of work. There are exceptions; so please follow the daily instructions from your instructor. You'll read more about this in the Following Instructions section below.getting-started/ contains detailed instructions to set up your local development environment. This includes setting up all the required tools and libraries such as: Python, Jupyter Notebooks, Docker, VS Code, and your Google Account. If you haven't done so already, please follow these instructions thoroughly to set up your dev environment.
course-overview (this document) contains introductory and overview material to help new students get quickly oriented and ready to proceed with the rest of the course.
workspace is an empty directory where you are expected to work on the lesson instructions and exercises. You'll read more about this in the Working on Exercises section below.
internal-code contains code for data generation scripts and other miscellaneous scripts. You can ignore this directory for now.
Daily Cadence
A typical day schedule looks something like this:
- 08:15-08:30am: Sign-in, attend your dev team's standup
- 08:30-09:00am: Attend all-hands meeting
- 09:00-10:00am: Morning lesson
- 10:00-12:00pm: Pairing
- 12:00-01:00pm: Lunch
- 01:00-01:15pm Timed Challenge
- 01:15-04:30pm: Pairing
- 04:30-05:00pm: Retro
Weekly Cadence
A typical week looks like this:
- Mon-Thu: Live lessons, pairing, and timed challenges
- Fri: Independent code reviews
Following Instructions
The episode includes a README.md markdown file that includes instructions and the lesson plan. The best way to follow these is directly inside VS Code. In order to view the markdown files install the VS Code Markdown extension by Yu Zhang. After installing the extension:
- Open the
README.mdfile for the episode. For example: /deb/ch01_intro/ep1/README.md - Press
CTRL+SHIFT+Vto open the Markdown Viewer and read the instructions - Follow the section below on [Working with Exercises] to add your own for the episode and exercises
Exercise: Open the
README.mdfor chapter 1 episode 1. Now open the Markdown Viewer window to see the formatted instructions. Alternatively, open the same file from the github web interface.
Working on Exercises
As you follow each episode's lesson and exercises, you are expected to add your own work under the /workspace directory. This directory would mirror the /deb directory. Therefore, it's best to structure this directory just like the /deb directory by creating chapters and episode subdirectories. For example all your work for chapter 1 episode 1 would be in a directory like: workspace/ch01_intro/ep1/.
Copy files from the /deb folder into your /workspace as needed.
NOTE: It's best that you keep the /deb directory as-is. That way you can restart your work from scratch by copying files into your /workspace directory at any time.
NOTE: You are expected to always work with virtualenvs (venv) while working on your lessons, exercises, and projects. Follow the section below on Working with VirtualEnvs.
Working with VirtualEnvs
You are expected to always work with virtualenvs (venv) while working on your lessons, exercises, and projects. A venv is a separate virtual Python environment that can be activated or deactivated. evnvs allow you to install 3rd party python packages without having to install them on your system python install which can cause issues when you're working on multiple exercises or projects. Python 3rd party packages are install via the Python's main package manager called: pip (Pip Installs Packages). Python pip packages are stored and maintained by PyPi.org.
Never pip install packages on your system Python install.
Each lesson has its own requirement.txt file with the exact list of pip packages used by the episode. A requirements.txt is a text file that includes list of pip packages (and their exact versions) required by your Python program. This list is used by pip to fetch and install packages from PyPi.org.
Real Python has a great tutorial on virtualenvs if you like to learn more about this Python feature. We recommend that you get very comfortable with them; you're going to use them all the time!
NOTE: You are NOT required to do this now! Just get familiar with using virtualenvs.
The example below shows creating and using a venv for chapter 1 episode 1. Follow these instructions for any episode requiring a venv:
Copy files and change into your episode's directory:
# copy chapter 1 episode 1 files
cp -r deb/ch01_intro/ep1 workspace/

# change into workspace dir
cd workspace/deb/ch01_intro/ep1/
Create a virtualenv and activate it:
python3.7 -m venv venv
source venv/bin/activate
Make sure your prompt shows
(venv) >indicating that yourvenvis activated.Pip install the
requirements.txtpackages:pip install -r requirements.txtYou can deactivate your
venvwhen you're done by running:deactivate
Working with Your Pair
You are expected to work on the episode lesson plan and exercises with your pair. You can use the VS Code LiveShare extension.
Assessment Projects (Code Reviews)
Each chapter includes an assessment project which is reviewed and graded by your instructor. These projects are always due on Fridays. You are expected to work on these by yourself and by yourself only. You can google and use all your previous work for the week. You are to turn your project in by the end of Friday. Your instructor would review your code and provide their feedback by the following Wednesday (most often the review would be done by the following Monday). If there are any issues with your project, you are expected to fix them and resubmit your project by the Monday of the next week.
In order to successfully submit your project, you must follow these instructions carefully:
- Create a separate git repo for each project.
- This will help you showcase your projects on your portfolio.
- Create a branch called
devand commit all your work to this branch. - Once you're ready to submit your project, create a new PR (Pull Request) into
main. - Add any notes to your instructor in the PR comment section.
- Make sure to include a
/README.mdto your project. ThisREADME.mdmust include:- A section with detailed instructions for setting up and running your code
- An architectural diagram detailing your code components
- Documentation for your code
Your instructor will use the git PR Suggestions feature to comment on your code and provide feedback where you need to change things. You can see these suggestions on the github PR page in your repo. You must resolve these comments in your next submission.
Concept Talks and Exercises
Concept Talks: During some morning or afternoon sessions your instructor will give a presentation on common data engineering concepts and best practices. This includes historical lectures about evolution of tools, learning terminology and concepts, and introductory lessons around topics that you will do further research or exercises on your own.
Conceptual Exercises: Some concepts include exercises which are intended to be completed either individually or with your pair. These exercises are completed during the afternoon sessions. Your instructor will let you know during the morning standup if there are any conceptual exercises (or talks) for planned for the today.
Concept Talk Examples:
- History of Data Warehousing
- Data Warehousing concepts: Facts & Dimensions
- The evolution of Databases and DAta storage
- Data Modeling Concept & Exercise
Group Projects
Group projects are weekly assignments that are intended to be completed with a larger team. These projects are around creating more complex and multi-step data engineering pipelines which require working with a team.
Contributions and Bug Fixes
This project is by no means perfect. As you go through the material, you might come across things where we haven't explained a concept well or where you would like to include your own research or fix typos. We have a contribution guidelines document which goes over how you can help to improve our content. Please do so; we cannot thank you enough for this. In order to make contributions, you have to clone the repository. Do this in a different location that your local forked copy. Always branch from main and submit your change commits to you own branch. You'll create a PR which will be reviewed by our team in order to merge your suggestions into our main branch. THANK YOU 🙏️